|
|
|
|
|
|
|
|
|
JAWS, Judicial Automated Workflow System, is going to be the primary interface between the
|
|
court, the people and organizations that have business before it. The current release will serve |
|
attorneys with the following primary function of scheduling – support of scheduling hearings and |
|
other events by parties, counsel or the court, serving copies of event notices via email. |
|
|
|
What it will require of you.
Attorneys will be required to register to JAWS. This will result in |
|
issuance of a username and password. You will not need any locally installed software other than |
|
Internet Explorer. The supported browser is IE7. If you are using IE8, you will need to run this |
|
in compatibility mode. There are no other hardware or software requirements. Once your register |
|
it is a necessity for you to associate yourself with your assigned cases immediately. This will |
|
ensure proper email notifications to be received by you. |
|
|
|
How the scheduling function works. JAWS is a general purpose scheduling engine designed to
|
|
accommodate various different scheduling models. The Court can (1) set matters on its schedule |
|
on its own initiative, with or without consulting the parties or counsel; (2) expose available times |
|
to the public, allowing the parties to coordinate the scheduling and place the matter on the |
|
Judge's calendar, or (3) allow the public to view available times, and request that the Judicial |
|
Assistant reserve a specific mutually agreeable time, with the final confirmation being |
|
communicated by email. The Judge's office will be able to limit available time to specific (2) expose available times |
|
purposes or impose specific sets of rules on what may be heard at the time. |
|
|
|
Parties will file their documents in paper with the Clerk. However the Court may require you to
|
|
upload the pleading, motion, or response to same at the time it is set for hearing or input specific |
|
data elements pertaining to a specified event. |
|
|
|
Should you require technical assistance at any time during this process or if you want to offer
|
|
feedback regarding your experience with JAWS, please contact the Administrative Office of the |
|
Courts’ Help Desk at 813-301-3700 or via email at helpdesk@fljud13.org. Thank you. |
|
|
|
|
|
|
|
To access JAWS, you may go to the Court’s website at www.fljud13.org and click the link for
|
|
JAWS or you may type in http://jaws.fljud13.org on your IE7 browser. If you are running IE8 |
|
then you will need to run in compatibility mode. |
|
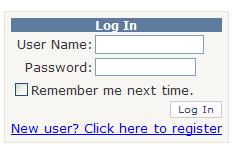
You will be prompted for your login.
|
|
 |
|
If you are a new user and need to register then click the link “New user? Click here to register”.
|
|
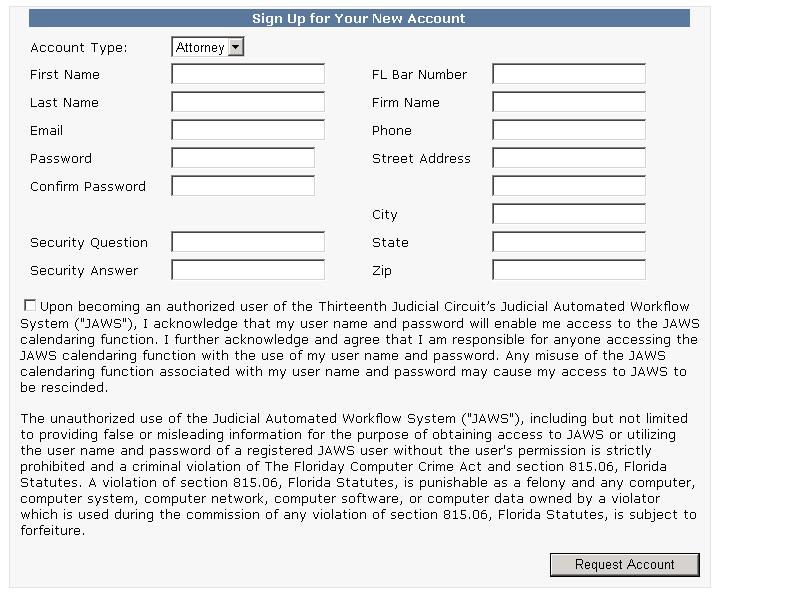
You will be required to enter in account information.
|
|
 |
|
You must acknowledge and accept the responsibilities of becoming an authorized user of JAWS
|
|
by clicking in the checkbox next to the acknowledgement. Next you must fill in all of the fields. |
|
|
|
The security question and answer is used in resetting your username or password. Enter a
|
|
question that you can remember in the security question text box. Then type in the answer to |
|
that question in the security answer text box. Example: Security Question - The name of my |
|
favorite pet? Security Answer – Max |
|
|
|
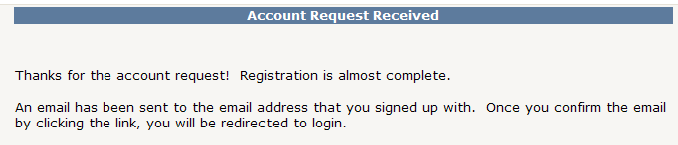
When finished, click the Request Account button and you will receive a message that your
|
|
account request has been received.
|
|
 |
|
|
|
Check the inbox for the email address that you provided and select the email from
|
|
JAWSADMIN@fljud13.org. This email contains your account information. Click the confirm
|
|
link to finish the registration process. This link will then take you to the JAWS Log In screen
|
|
where you will type your user name and password.
|
|
|
|
At the very top of the screen you see a tab named Court Calendar. Underneath this you will see
|
|
a list of menu options: Available Time, My Cases, Case Search, and My Profile. This document
|
|
will provide explanations for each of these options.
|
|
|
|
 |
|
|
|
|
|
|
|
|
|
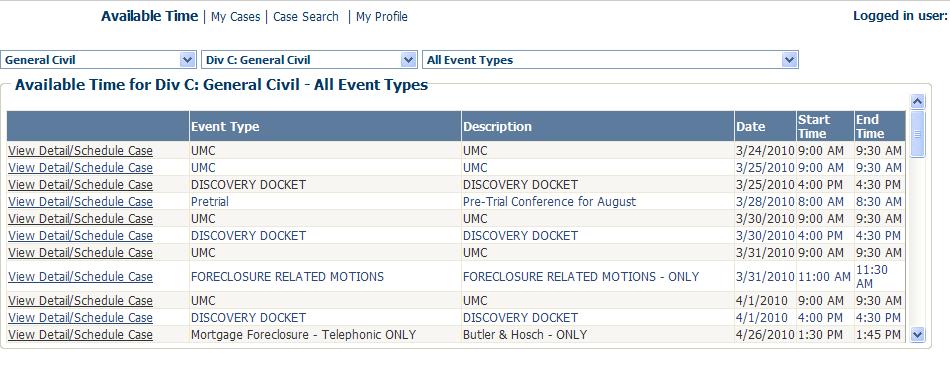
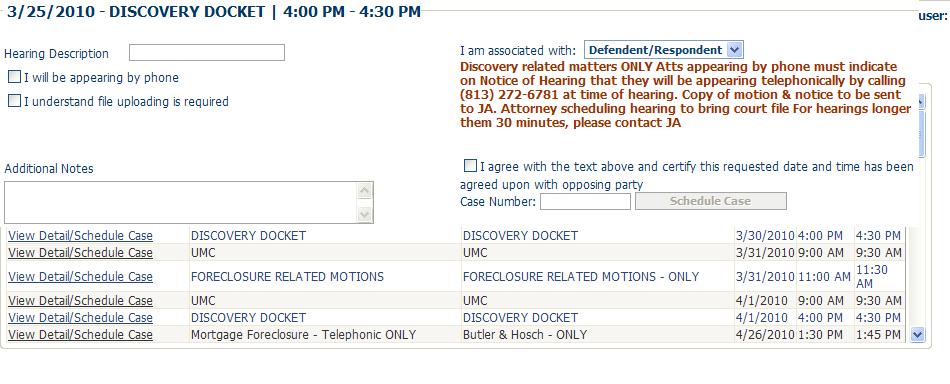
• Below the list of menu options, you will see
the drop down selection boxes for |
|
the division information. If you are assigned to more than one division then |
|
you can use the drop down arrows to select the desired division. |
|
• Once you select the desired division then the list of available events and time
slots will appear. |
|
 |
|
• Click View Detail/Schedule Case by the desired event and timeslot. This will
|
|
• provide you with the details about this event and time slot.
|
|
 |
|
• The court division may require specific information from you when
|
|
scheduling an event. This may be in the form of free form text boxes, drop
|
|
down boxes, or check mark boxes. This collection of information may
include: |
|
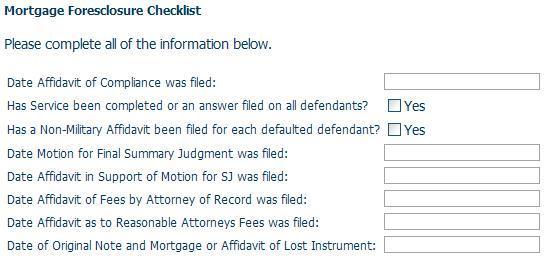
• a hearing description to be entered – for example Motion to Dismiss |
|
• the Mortgage Foreclosure checklist – see below for the information
that must be completed. |
|
|
|
 |
|
• a file to be uploaded – see View/Upload Files section for further
details |
|
• if appearing by phone |
|
• trial requirements – for example trial type, trial duration, pre-trial
date |
|
 |
|
 |
|
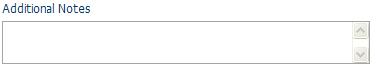
• additional notes |
|
|
|
 |
|
• party association – use the drop down selection to identify who you
represent |
|
• case number – must use the full 12 character case number including
the dashes |
|
• certification that you have contacted the opposing party and the
requested date and time has been agreed upon |
|
• NOTE:
You must select the certification check box in order to
schedule a case |
|
• The court division will also include instructions to be followed for the |
|
specified event type. Please read these carefully and comply with all instructions. |
|
• Click Schedule Case |
|
|
|
The system will take you to a screen in which you are required to add/confirm the Associate
|
|
Parties of a case. The people listed in this screen will receive email notifications.
|
|
|
|
| | |
| |
• This is important to make sure all parties associated with a case are
|
|
defined and email addresses are captured so emails go out to the right
people.
|
|
|
|
• You can enter a letter, name or partial name and press the search
|
|
icon. The system searches last name and firm name files with a like
|
|
command. For Example – you can enter Bri and the system will
|
|
display all external users that have a last name or firm name
|
|
containing the letters 'Bri'. (not case sensitive)
|
|
|
|
• If you find the person that you want to associate to this case, then
|
|
check the box next to their name and press add, make sure you select
|
|
the party affiliation and it will move that person to the associated
parties list.
|
|
|
|
• The affiliated with drop down box allows you to associate what
|
|
person with defendant/respondent, plaintiff/petitioner, or neither.
|
|
|
|
• If the system cannot find a match in JAWS then a message will
|
|
display letting you know that no matching users were found. You
|
|
can call the party and ask them to register to JAWs.
|
|
|
|
• Click Schedule Case when finished. The system will return to the
|
|
Available Time screen and a red message at the bottom right hand side will appear. Example:
|
|
Your appointment has been scheduled or requested.Your confirmation number is 12J-34946
|
|
|
|
• If you have selected a time slot in which the court division requires you to request a time slot and then wait for their decision to approve
|
|
or not, you will get an email confirming or denying this event once the court division makes a decision.
|
|
|
|
• Underneath this information you will see the case scheduled in the
time slot selected
|
|
|
|
|
|
|
|
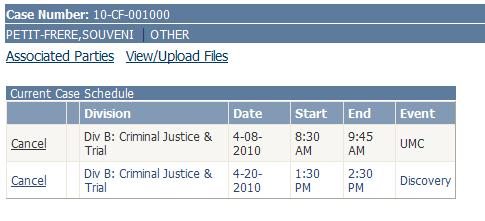
• This option allows you to see a list of all of your cases.
|
|
 |
|
If you select the case then you will be provided with case style and current case schedule at the
bottom of the screen.
|
|
|
|
 |
|
|
|
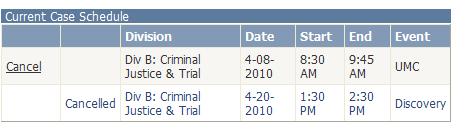
If you need to cancel a scheduled event, you can select Cancel. A pop-up window will appear
for you to enter the Cancel Reason,
|
|
when finished typing click the Cancel Hearing button.
Notice the cancelled event now shows cancelled.
|
|
|
|
 |
|
You can also access the Associate Parties menu option from this screen. In addition you can
View/Upload Files.
|
|
|
|
|
|
|
|
 |
|
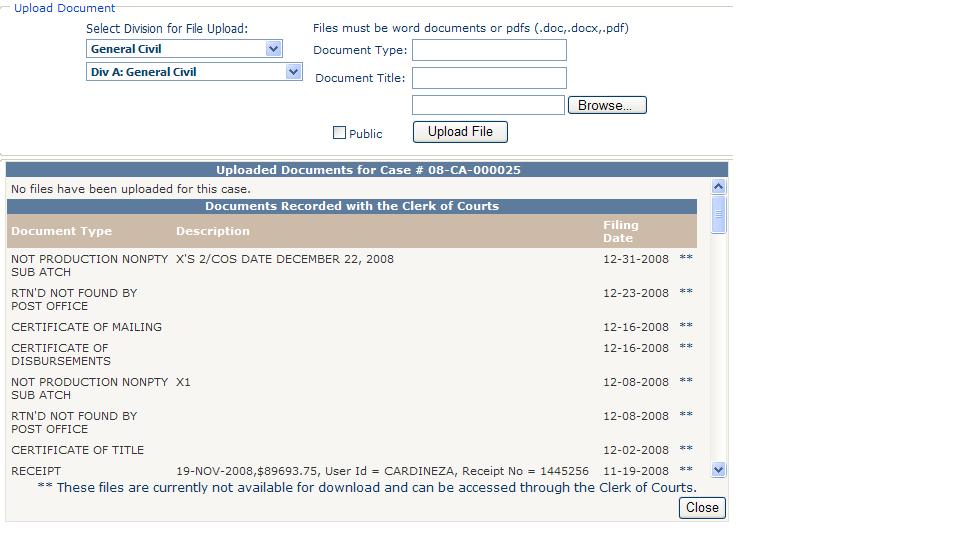
• This screen shows any .doc or .pdf documents that have been
uploaded that pertain to the associated case.
|
|
• Both internal and external users have the ability to upload files
|
|
• In order to upload a file, make sure the correct division is selected,
put a description in the Document Type, a file name in the Document Title
|
|
field and then click browse to select the appropriate file on your hard drive. The file size must be smaller than 10 MB.
|
|
|
|
• When you have entered the appropriate information for the desired
document then select Upload File.
|
|
• Once uploaded the file will display in the top section of the screen
under the Uploaded Documents for Case #XX-XX-XXXXXX.
|
|
• Once a file has been uploaded, any user that has privilege to see the
file can click on download to open or save the file to their machine.
|
|
By default, internal users (Judges and Judicial Assistants) can see all
uploaded files for a given case. External users can only see their
|
|
own uploaded documents and any document that has been shared.
|
|
• Courts are filings that have been filed with the Clerk. This
information comes from the Clerk’s database
|
|
and since these files are not retrievable electronically, this is only displayed as a list.
|
|
• When finished select Close.
|
| |
|
|
|
|
|
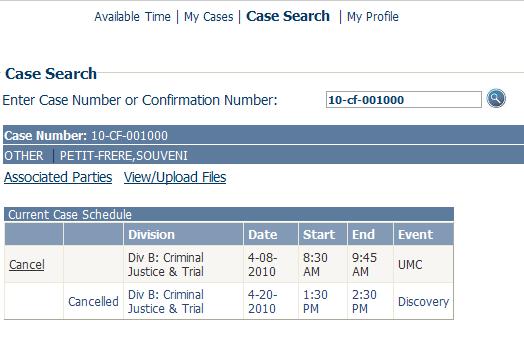
If you have a case number, you can go to Case Search.
|
|
• Case Search – You can enter a case number or a confirmation number and the case
details and the current case schedule displays.
|
|
If a case number is not found in the
system then you will receive a message indicating the case was not found.
|
|
From this screen you have the option to cancel an event or utilize the associated parties and
view/upload files options as described above.
|
|
 |
|
|
|
|
|
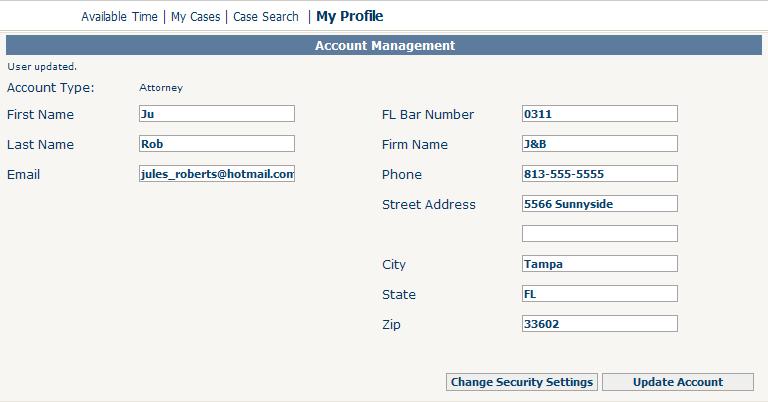
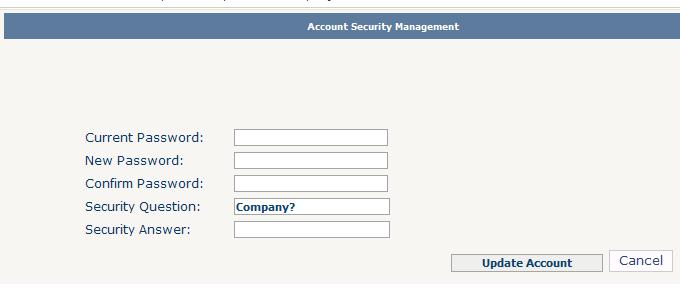
• To edit your account settings or to change your security settings, you would use the My Profile
option.
|
|
 |
|
• Once you have changed the desired fields, click the Update Account button.
|
|
• If you want to change your security settings, click the Change Security Settings
button.
|
|
You will be prompted to type in your current password, new password,
confirmed password, security question, and security answer.
|
|
Once finished click Update Account.
|
|
 |
|
Back to Contents
|
|
|